
Agile – Scrum in 10 minutes
Methodology
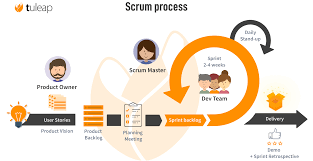
For projects that require high speed, we should adopt the Agile methodology using the Scrum framework.
With Agile, delivering working software is prioritized over comprehensive documentation. However, during the development process, it is essential to document our tasks and track all information as thoroughly as possible for future reference.
In this setup, you will take on the role of the Product Owner (PO), responsible for defining requirements through PBIs (Product Backlog Items):
- Create Epics: Define high-level modules for the app (e.g., Dashboard, Workout, Calories, etc.).
- Break down into PBIs: For each Epic, divide it into specific PBIs that can be released to end-users as quickly as possible (typically in 1 or 2-week Sprints). To create these PBIs, you simply need to follow the format: “As a [Role], I want [Goal], so that [Benefit/Value].”
- Collaborate and Execute: Afterward, DEVs will review PBIs and discuss them together to reach a unified solution. We will then plan to complete the work within one week to push the update to the Store.
If you would like to dive deeper into this for more effective management, I recommend reading up on Agile Scrum frameworks.
Git strategy
For a fast-paced project using Agile Scrum with weekly releases, you need a Git strategy that balances speed with stability. The best approach is a Simplified Git Flow (also known as a Feature-Branch Workflow).
Git Branching Strategy & Workflow
To maintain a high velocity for our 1-week Sprints while ensuring the stability of our Store releases, we will follow this strategy:
1. Core Branches
main: The production branch. It must always be stable. Code is only merged here when we are ready to push a new version to the Store. Every merge tomainshould be tagged (e.g.,v1.0.2).develop: The integration branch. This is where we combine all completed features for the current Sprint. It serves as our “Pre-release” environment.
2. Supporting Branches
feature/[PBI-ID or Feature-Name]: Created for every specific PBI.- Example:
feature/dashboard-uiorfeature/calories-tracker. - These branches are branched off from
developand merged back intodevelopvia a Pull Request (PR).
- Example:
The Weekly Workflow
- Start of PBI: At the beginning of a task, the developer creates a new feature branch from
develop. - Continuous Development: Code is committed locally. We recommend using Conventional Commits (e.g.,
feat:,fix:,refactor:) for better traceability. - Peer Review: Once a PBI is finished, a Pull Request (PR) is opened to merge into
develop. This allows DEVs to review the code and ensure it aligns with our discussed solution. - Integration & Testing: We test the unified features on the
developbranch. - Release to Store: At the end of the 1-week Sprint,
developis merged intomain. This triggers our final build to be uploaded to the Store.
Why this works for us:
Safety: The main branch remains untouched until the very end of the Sprint, ensuring we always have a stable version to roll back to if needed.
Traceability: Each branch is linked to a specific PBI, making it easy for the PO to track progress.
Speed: It eliminates the overhead of complex Git structures, allowing us to focus on shipping “Working Software.”
Implementation
To implement this process effectively, Jira is the perfect tool to bridge the gap between your role as PO and the development team. Here is how you should structure the hierarchy in Jira to keep everything organized for your 1-week Sprints:
1. Jira Hierarchy Setup
| Level | Jira Issue Type | Description |
| Level 1 | Epic | High-level features (e.g., Dashboard, Workout Module). These span multiple Sprints. |
| Level 2 | Story (PBI) | Your requirements written as: “As a [User], I want [Goal]…”. This is what you deliver to the user. |
| Level 3 | Task / Sub-task | Technical steps needed to finish a PBI (e.g., Setup Database, API Integration, UI Design). |
2. The Workflow in Jira
Step 1: Backlog Grooming (The PO’s Job)
- You create Epics to categorize the app’s main sections.
- Under each Epic, you create Stories (PBIs).
- Action: Ensure every PBI has a clear Acceptance Criteria (AC)—a checklist of what the feature must do to be considered “Done.”
Step 2: Sprint Planning (Collaboration)
- At the start of the week, we move PBIs from the Backlog into the Active Sprint.
- DEV team will break your PBIs down into Technical Tasks.
- We assign Story Points (estimation) to ensure we aren’t over-committing for the 1-week deadline.
Step 3: Execution (The Board)
We will use a Kanban-style Sprint Board with these columns:
- To Do: Work waiting to be started.
- In Progress: What we are currently coding.
- Review/QA: DEVs are checking each other’s code (linked to the Git PR).
- Done: Feature is ready for the Store.
3. Linking Jira to Git (Crucial for Tracking)
To achieve the “maximum tracking” you mentioned, we should connect Jira to your Git provider (GitHub/Bitbucket):
Visibility: You (as PO) can see the real-time status of the code directly inside the Jira ticket without asking the devs.
Branch Naming: Name your Git branches using the Jira ID (e.g., feature/APP-101-workout-logic).
Smart Commits: If we commit with APP-101 #comment Fixed login bug, the comment automatically appears inside the Jira ticket.